|
How to use the EAC to create an Outlook Anywhere migration endpoint - Step by step with screenshots
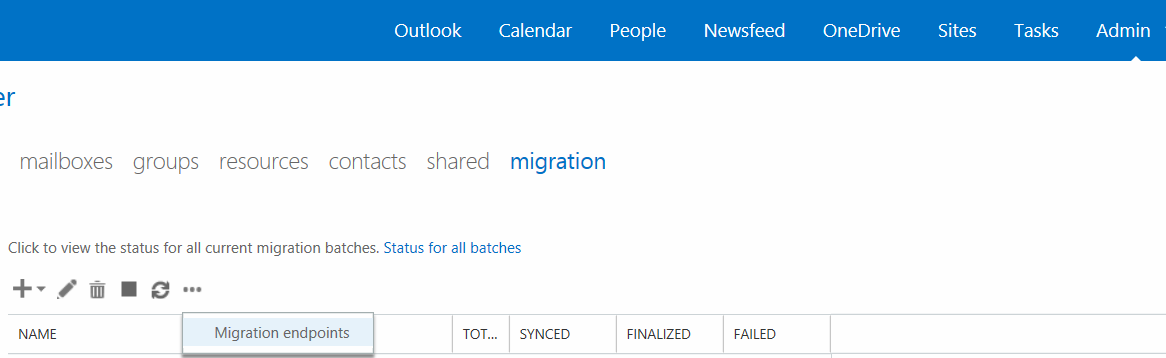
1. Login Office 365.
2. Click Admin and then Exchange.
3. Click Migration.
4. Click More More Options Icon, and then click Migration endpoints.
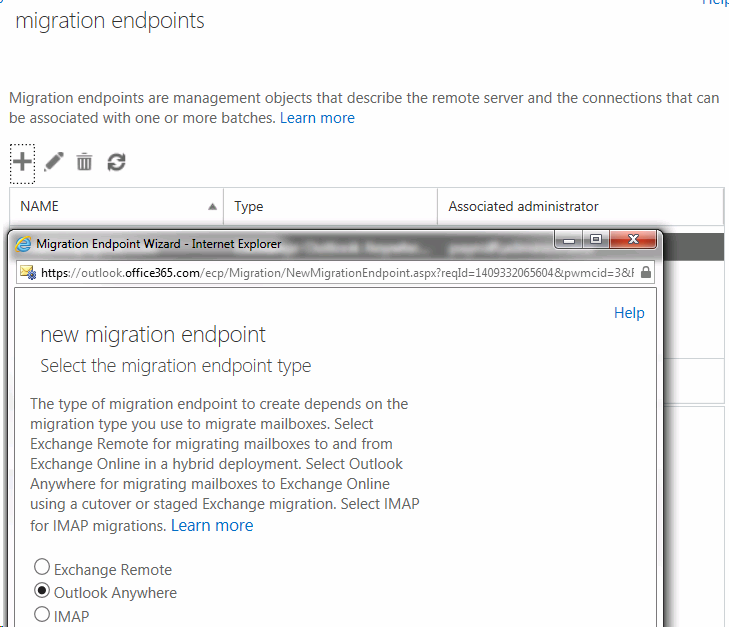
5. On the Migration endpoints page, click + Icon. On the Select the migration endpoint type page, click Outlook Anywhere,
and then click Next.
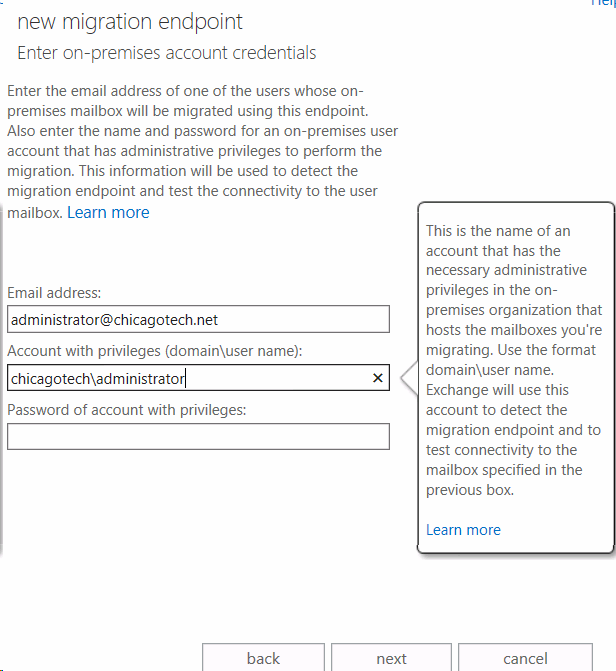
6. On the Enter on-premises account credentials page, complete the following
boxes:
◦ Email address Type the email address of any user in the on-premises
Exchange organization that will be migrated using this endpoint. Exchange
Online will test the connectivity to this user's mailbox.
◦ Account with privileges Type the user name (using the domain\user name
format or an email address) for an account that has the necessary
administrative privileges in the on-premises organization that hosts the
mailboxes that you're migrating. Exchange Online will use the Autodiscover
service and this account to detect the migration endpoint and to test the
permissions assigned to this account by accessing the mailbox specified in
the previous box.
◦ Password of account with privileges Type the password for the
administrator account that you specified in the previous box.
7. Click Next. Exchange Online uses the information on the Enter on-premises
account credentials page to test connectivity to the source server, and then
displays the Confirm the migration endpoint page. Do one of the following
based on whether the connection settings were successfully detected:
◦ If Exchange Online successfully connects to the source server, the
connection settings are displayed. Click Next.
◦ If the test connection to the source server isn't successful, you have to
provide values for the following boxes:
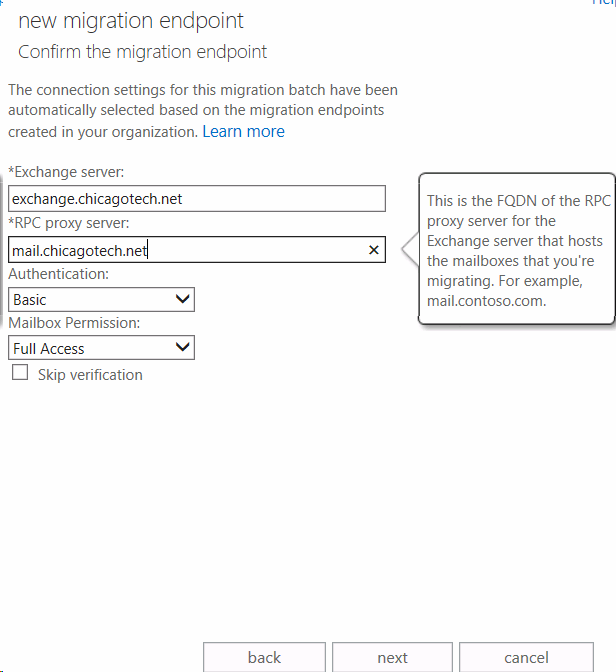
◾ Exchange server Type the fully qualified domain name (FQDN) for the
on-premises Exchange server. This would be the host name for your Mailbox
server; for example, exchange.chicagotech.net.
◾ RPC proxy server Type the FQDN for the RPC proxy server for Outlook
Anywhere. Typically, this will be the same as your Outlook Web App URL; for
example, mail.chicagotech.net. This is also the URL for the proxy server that
Outlook uses to connect to an Exchange server.
You have to successfully connect to the source server to continue.
importantImportant:
Exchange Online creates a new migration endpoint using the connection
settings that were successfully discovered or that you provided manually. We
recommend that you create migration endpoints whose connection settings were
automatically discovered rather than creating endpoints whose settings you
entered manually. This is because the Autodiscover service will be used to
connect to each user mailbox during the migration. If manual settings are
used, Exchange Online won't use the Autodiscover service, but will connect
to a specific source server using the connection settings you manually
entered. If you use manual settings and have multiple on-premises Exchange
servers, you may need to create different migration endpoints that
correspond to each server.
8. Click Next. Enter information in the following boxes:
Note:
As previously stated, there is a limit of100 concurrent migrations for all
Outlook Anywhere migration endpoints in your organization.
◦ Maximum concurrent incremental syncs This is the number of connections to
the source server that are available to perform incremental
synchronizations. If the value is set to 10, the default value, then
incremental synchronization can be performed on up to 10 mailboxes at the
same time. For example, if the endpoint is configured with 50 maximum
concurrent migrations and 20 maximum concurrent incremental syncs, 20
connections can be used for incremental synchronization, if necessary. The
other 30 connections are reserved for initial synchronizations.
During incremental synchronization for cutover Exchange migrations, the
mailboxes in the on-premises Exchange organization and the corresponding
Exchange Online mailboxes are synchronized every 24 hours. This means that
any new messages sent to the on-premises mailboxes are copied to the
corresponding Exchange Online mailbox.
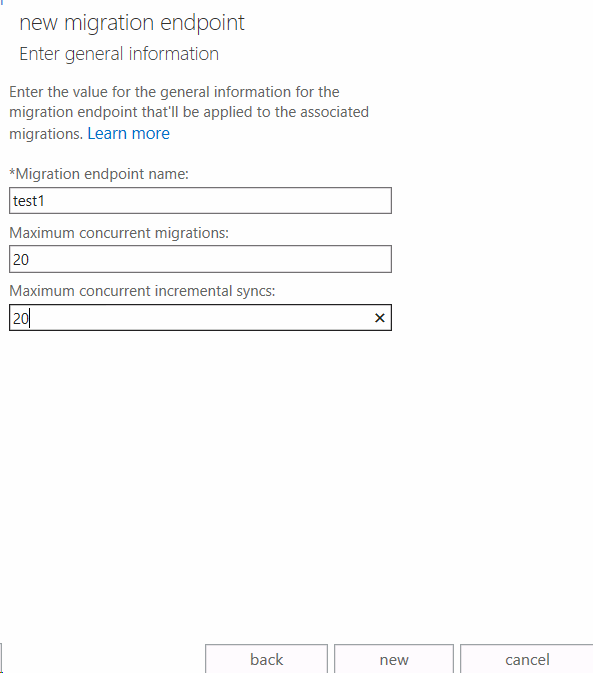
9. Click New to create the migration endpoint.
Post your questions, comments, feedbacks and suggestions
Contact a consultant
Related Topics
|
|